How To Break 100 Lesson 6: The Full Swing

If you’ve been diligently following our course on How To Break 100 by the book, you’ve put some serious work into your golf game up to this point, and you’ve got a great foundation of skills that help you shoot lower scores. It wouldn’t even be surprising if you’ve already hit your goal score of breaking 100 with the work you’ve done on your game from 100 yards and in.
RELATED: How To Break 100 Course Overview
Either way, there’s more work to do as we’ve arrived at the full swing portion of the course. The full swing has more pieces and moving parts than putts, chips, pitches, and partial wedge shots, so we’re breaking it down into bite-sized pieces to help you build a consistent, repeatable golf swing.
PREVIOUS LESSON: How To Break 100 Lesson 5: Wedges
Your Full Swing & Approach Game Benchmarks
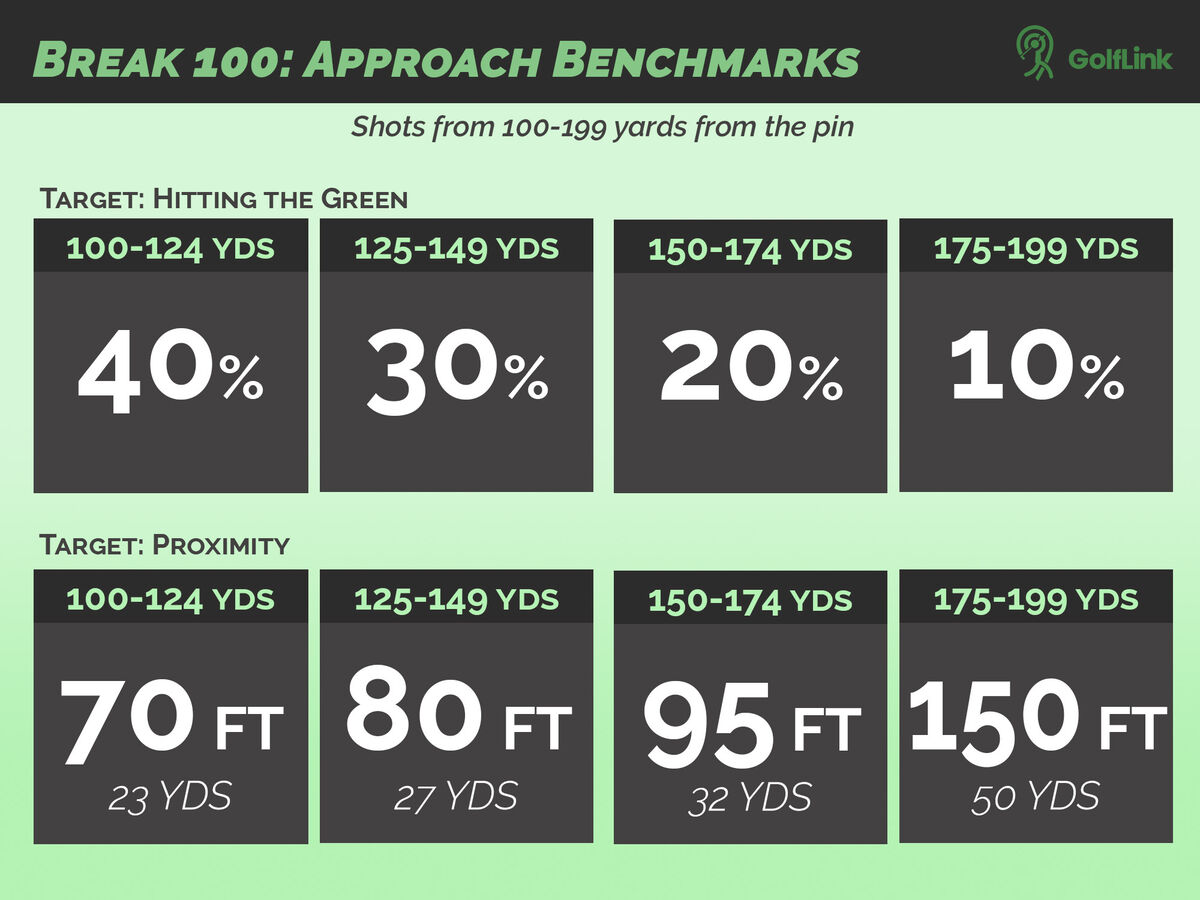
To evaluate your full swing, we’re going to look specifically at the shots you play between 100 and 200 yards. Shots from inside 100 yards are covered in the wedge and short game sections, and most of the shots you hit from outside 200 yards will be off the tee (which we’ll cover later).
These benchmarks represent players who consistently shoot scores in the 90s, once you can hit these consistently, you will be well on your way to shooting your target scores.
|
Distance |
Target Hitting the Green |
Target Proximity (to pin) |
|
100-124 yds |
40% |
70 feet/23 yards |
|
125-149 yds |
30% |
80 feet/27 yards |
|
150-174 yds |
20% |
95 feet/32 yards |
|
175-199 yds |
10% |
150 feet/50 yards |
Steps of the Full Swing
As we build the full swing, there are four main checkpoints to consider: the starting position, the top of the backswing, impact, and the finish. Ty Andersen illustrates how to get into each of the four positions.
- Without a club, stand shoulder-width apart and bend at the waist as you slide your hands down your legs to your knees, then stop
- From that posture, put your hands together hanging straight down from your shoulders and hinge your thumbs. This is the address position (position 1)
- To get to the top of the backswing, swing your thumbs over your shoulder. Allow your hips to rotate around 45 degrees and your shoulders to turn around 90 degrees
- Drop your arms back to position 1 as your body unwinds, this is position 3
- To get to position 4, swing your arms up over your shoulder. Notice your weight shift to your front leg, your back heel is in the air, and your body has pivoted to face your target.
Work on hitting each of these positions in order, adding a little more pace and rhythm as you get more comfortable. Next, pick up a golf club and continue going through the checkpoints with pace and rhythm.
As you get comfortable with this motion, hone it by making at least 20 practice swings every day. This will build the consistency necessary for a repeatable swing. Real improvement cannot begin until you have consistency. It’s easier to improve a swing that has a repeatable miss than one that has a different miss every time.
As we move forward, let’s take a closer look at the takeaway, top of the backswing, downswing, impact, and finish.
Step 1: The Takeaway
Adam Harrell helps get our swing started with the takeaway, the point where the club shaft is parallel to the ground.
Start in your setup position and lay a club or alignment stick along your toe line. Take the club back until it is parallel to the ground. From here, there are two key checkpoints to confirm you’ve got a great takeaway, which will set up a great swing.
- When the club is parallel to the ground, check that the shaft lines up right on top of the club on the ground
- Check that the club face is perpendicular to your target line (the shaft or alignment stick on the ground), also known as the toe up position
Getting into this takeaway position properly and consistently will help you hit the ball straighter and farther.
To practice this phase of your swing, rehearse getting into the proper position, hitting those two checkpoints, a couple dozen times. By then, a perfect (and repeatable) takeaway will be second-nature, and you will begin to build a more consistent swing.
Step 2: Top of the Backswing
One of the things we love about Mike McGetrick’s instruction is that he keeps it simple. As McGetrick teaches the backswing, he simply focuses on what you should feel with your hands and arms.
From the parallel position that you mastered in the step above, continue to work your arms back from the ball, allowing your body to turn naturally. When you’ve turned your back to your target, your backswing is done. The club should be somewhere near, but short of, parallel to the ground at the top of your backswing. As you work on building a consistent, repeatable swing, there’s no need to make your backswing any longer than that.
Avoid lifting the club or trying to wrap it around your body in your backswing.
Here’s a simple drill you can use to hone the feel of a great backswing, which will build consistency in your full swing.
- Without a club, get into your posture and tuck your thumbs into your palms as McGetrick demonstrates
- Begin swinging your arms back and through about waist-high, getting the feeling of how your arms swing in front of your body
- Next, repeat the same feeling with a club in your hands.
Building a simple and repeatable backswing is a great foundation for consistency in your full swing, which is perhaps the most important factor that differentiates golfers struggling to break 100, and those who shoot in the 90s and below regularly.
Step 3: The Downswing
Once you get to the top of your backswing, one of the most important moments in the golf swing is the sequence of the downswing. Follow Hank Haney's instruction and start your downswing from the ground up, shifting weight from your right heel to your left toe (for right-handed golfers). That move triggers your knees, hips, body, and arms to swing as you lower the arms and the club.
In the backswing, your upper body turns and lower body resists, the downswing is the opposite, lower body turns and upper body resists.
Step 4: Impact
Everything you have learned about the golf swing up to this point is very important. However, there is only one moment of truth in a golf swing: the moment of impact. You either make ball-first contact with the club face square to your target, or you don’t.
Tim Cusic demonstrates the ideal impact circumstances:
- Make contact with the ball and the ground simultaneously, or the ball just before the ground. Avoid hitting the ground before the ball (known as fat shots).
- With an iron, your hands should be slightly forward of the ball at impact. If you picture a line perpendicular to the ground coming up from the ball, your hands should cross the line before your club head
- Let your body turn through impact, riding your momentum into a balanced finish
The Finish
Picturing and feeling your ideal finish position during your swing can help your body naturally hit all the checkpoints of a good swing. Debbie Doniger outlines some checkpoints of a perfect finish, including:
- Your back toe is on the ground with your heel in the air and your foot more or less perpendicular to the ground
- 99 percent of your weight should be on your front foot
- Your right shoulder is slightly closer to the target than your left,
- You’ve maintained your spine angle through your swing,
- Your eyes are looking at your target
- Your belt buckle is facing the target
A great drill to ingrain the perfect finish is to put a tee in the ground and set up to it. Swing back about half way, then swing into your finish, hitting the checkpoints above, and clipping the tee out of the ground on the way through. Hold your finish to ensure great balance. This drill will train you to finish your swing the right way every time.
Practice Makes Perfect
With five distinct elements, working on your full swing might seem like a lot to take in. However, each of these elements are relatively simple, and one step flows seamlessly into the next. As you work through these techniques and drills and build your swing from start to finish, the goal is for your full swing to become one motion, instead of feeling like five.
Practice these elements diligently and build one on top of the next until you’ve got a consistent, repeatable full swing. Before you know it, your full swing benchmarks become will seem like child’s play.
NEXT LESSON: How To Break 100 Lesson 7: Driver