Master the Proper Golf Grip in 5 Easy Steps
Award-winning golf instructor Brendon Elliot, PGA, describes the proper golf grip in simple terms

Using a proper golf grip is an essential component of playing good golf. After all, the only connection between the body and the club is through the hands. That connection has a massive influence on the shape of the shots you hit.
A proper grip involves placing your hands on the club in a way that allows for maximum control and power during your swing. With the correct grip, you'll be able to swing with confidence and accuracy.
While it's absolutely true that all golfers are built differently and have their own unique idiosyncrasies, the basic techniques of a standard grip will be your starting point to work from.
Today, I will talk about the basics of a standard golf grip.
The Steps To a Proper Grip
Properly setting your hands on the golf club is crucial to your consistency as a ball striker and your overall game.
The steps below cover everything you need to know to grip the golf club correctly. For the consideration of both left-handed and right-handed golfers, I will be referring to the hands as the "Lead Hand" (left hand for a right-handed player) and the "Trail Hand” (right hand for a right-handed player).
The 5 steps to the proper golf grip are:
- Choose the right grip type
- Proper lead hand placement
- Proper trail hand placement
- Alignment checkpoint
- Check your grip pressure
1. Choose the Right Grip Type For You
There are three basic types of grips: Interlocking, Overlapping, and 10-Finger. Below is a snapshot of each grip type, including its advantages and disadvantages.
Interlocking Grip

Here's what an interlocking golf grip looks like
The Interlocking Grip is a grip used by golfers where the pinky finger of the trail hand is interlocked with the index finger of the lead hand. This grip is typically used by golfers with smaller hands or those who prefer a tighter grip. The Interlocking Grip provides a more secure connection between the hands and the club, which can help improve control and consistency during the swing.
The Interlocking Grip might not be suitable for golfers with larger hands, as interlocking the fingers could cause discomfort or even pain. Some golfers may find it challenging to maintain consistent pressure with the Interlocking Grip, which can result in weaker shots or inconsistent ball striking.
Overlapping or Vardon Grip
Here's what the overlapping, or Vardon grip looks like
The Overlapping Grip, also known as the Vardon Grip, is a type of grip used by golfers where the trail hand's little finger overlaps the lead hand's index finger. This grip is typically used by golfers with larger hands or those who prefer a more relaxed grip. The overlapping grip allows for more flexibility in the hands, which can help golfers achieve more natural wrist movement during the swing.
However, as with the Interlocking Grip, some golfers might find it challenging to maintain consistent grip pressure with the Overlapping Grip, which can lead to weaker shots or inconsistent ball striking.
It all boils down to how big or small a golfer's hands are and which of these two grip types would work best.
10-Finger Grip
The 10-Finger Grip, also known as the Baseball Grip, is a type of grip used by golfers where all 10 fingers are placed on the club, with no overlapping or interlocking of the fingers. This grip is often used by beginners or those with weaker grips, as it provides more surface area for the hands to grip the club.
However, the 10-Finger Grip can limit wrist movement during the swing, making generating power and controlling the clubface more challenging. It's important to note that the 10-Finger Grip may not be as effective for advanced golfers looking to improve their game.
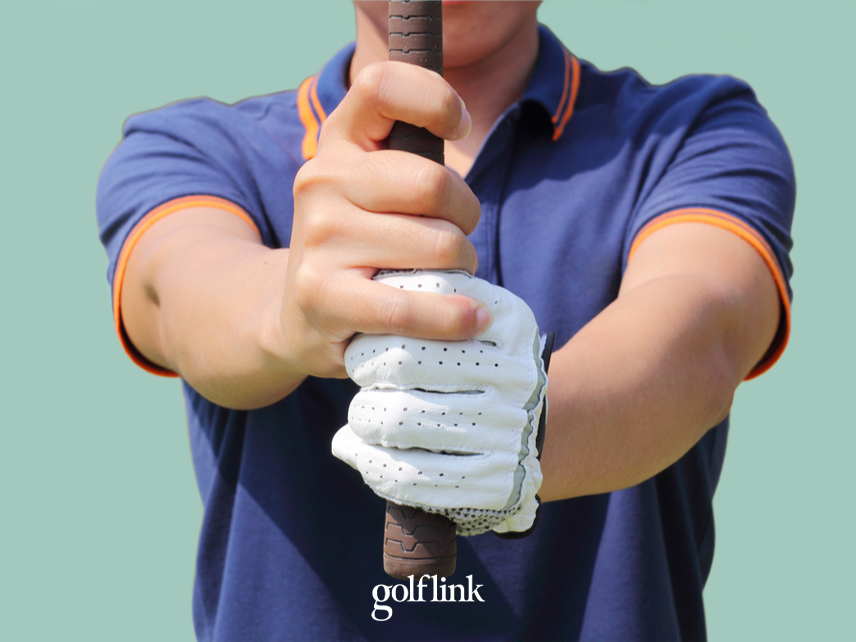
2. Placing Your Lead Hand on the Club
Once you have decided which grip type is best for you, you can move on to how you position your hands on the club.
To start, place your lead hand on the club so that your palm faces away from the target. Your thumb should be pointing down towards the ground.
The club's grip should lie across the area where your fingers meet your palm, and your thumbpad should lay on top of the club as you close your hand around it.
An excellent checkpoint to determine whether you have your lead hand on the club correctly is to look at your knuckles. As you look down at the club soled on the ground in front of you, with the lead hand holding it, you should see three knuckles—from your middle, ring, and pinky fingers.
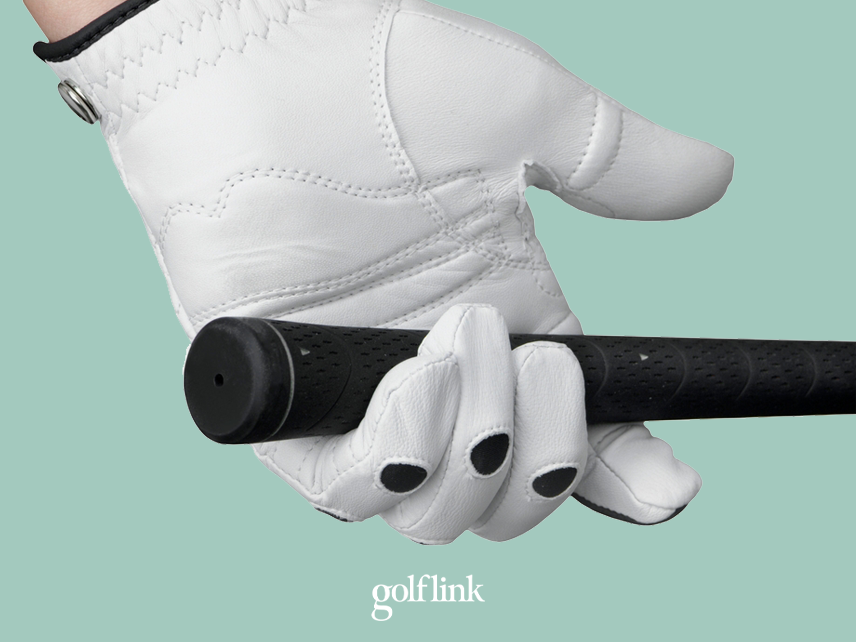
3. Placing Your Trail Hand on the Club
Next, place your trial hand on the club so that your palm faces toward your target. As with the lead hand, your thumb on the trail hand should also point down toward the ground.
The club's grip should lie across your fingers in your trial hand, and your lifeline, which runs through the center of your palm, should lay on top of the lead hand's thumb as you close your hand around it.
Make sure that your hands are butted up close to one another with no separation between them. The hands must work together as a unit.
4. Alignment Checkpoint
The Vs that you create between your thumb and index finger on both hands should point toward your trail shoulder – the right shoulder for a right-handed player. This is a classic tip and checkpoint for ensuring your hands are properly positioned on the club.
5. Check Your Grip Pressure
Your grip pressure should be firm but not too tight. You should be able to wiggle your fingers slightly. One of my favorite tips of all time describes the ideal grip pressure and comes from the great Sam Sneed:
"Hold the club as if you had a little baby bird in your hand."
The idea behind this analogy is that to keep that bird in your hands, you must hold it securely enough that it doesn't fly away, and gently enough not to crush it.
This is what proper the proper grip pressure feels like.
Summing it Up
Remember, it's essential to practice your grip regularly to ensure that it becomes second nature. With a proper grip, you'll be well on your way to controlling your clubface much better than you do today.